The part(s) or condition(s) listed below for the symptom Dryer won't start are ordered from most likely to least likely to occur. Check or test each item, starting with the items at the top of the page.
 Dryer Drum Won’t Turn? Electric Dryer Troubleshooting
 Dryer Drum Won’t Turn? Gas Dryer Troubleshooting
 Dryer Takes Too Long to Dry Clothes? Electric Dryer Troubleshooting
 Dryer Takes Too Long to Dry Clothes? Gas Dryer Troubleshooting
 Dryer Not Heating? Electric Dryer Troubleshooting
 Dryer Not Heating? Gas Dryer Troubleshooting
 Dryer Won’t Start? Electric Dryer Troubleshooting
 Dryer Won’t Start? Gas Dryer Troubleshooting
 How to Clean the Traps and Ducts on a Dryer - Tech Tips from Repair Clinic
 Using the Dryer Belt - Tech Tips from Repair Clinic
 Resistance Testing: Dryer Heating Element - Tech Tips from Repair Clinic
 Clean Dryer Lint Trap - Tech Tips from Repair Clinic
 Avoid Slamming Washer/Dryer - Tech Tips from Repair Clinic
 5 Tips For Your Dryer - Tech Tips from Repair Clinic
 Gas Dryer Won't Stop? Gas Dryer Troubleshooting
 Gas Dryer Tripping Breaker? Gas Dryer Troubleshooting
 Gas Dryer Overheating? Gas Dryer Troubleshooting
 Gas Dryer Making Noise? Gas Dryer Troubleshooting
 Electric Dryer Won't Stop? Electric Dryer Troubleshooting
 Electric Dryer Tripping Breaker? Electric Dryer Troubleshooting
 Electric Dryer Overheating? Electric Dryer Troubleshooting
 Electric Dryer Makes Noise? Electric Dryer Troubleshooting
 Nuts & Bolts: Before You Call - Dryer Won't Turn On
 Nuts & Bolts: Before You Call - Dryer Is Noisy
 Nuts & Bolts: Before You Call - Dryer Cycle Takes Too Long to Dry
 Nuts & Bolts: Before You Call - Dryer Leaves Clothes Still Wet
 Nuts & Bolts: Before You Call - Dryer Displays Strange Numbers or Letters
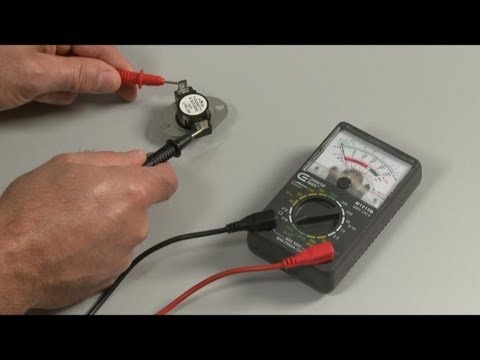
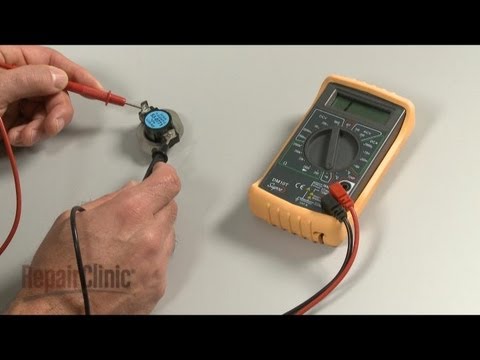
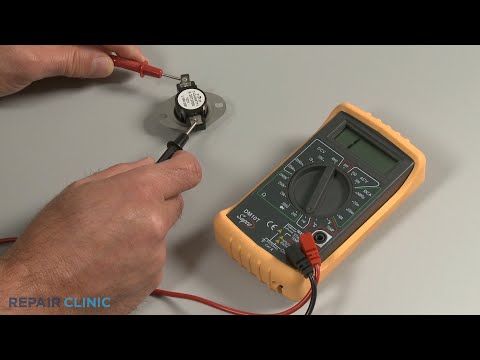
The thermal fuse is a safety device designed to protect the dryer from overheating. The fuse is located on the blower housing or at the dryer’s heat source such as the heating element on electric dryers or at the burner on gas models. The fuse should be closed for continuity meaning it has a continuous electrical path through it when good. If overheated the fuse will have no continuity meaning the electrical path is broken and the fuse has blown. A multimeter can be used to test it for continuity. Be aware that a blown thermal fuse is an indication of a restricted exhaust vent from the dryer to the outside. Always check the dryer venting when replacing a blown thermal fuse.
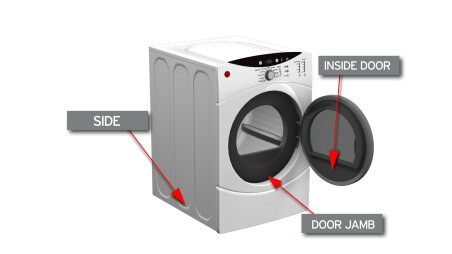
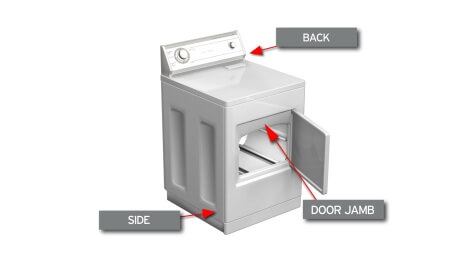
Confirm the door is fully closed; the dryer will not start with the door open. Remove anything that is obstructing the door.
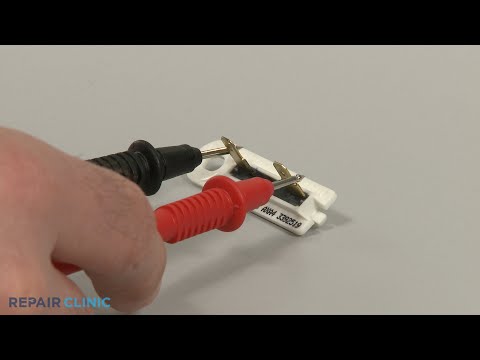
To determine if the start switch is defective, attempt to start the dryer. If the dryer hums but does not start, the start switch is not at fault. If the dryer does not respond or make any noise, the start switch could be at fault. Use a multimeter to test the start switch for continuity. If the switch does not have continuity, replace it.
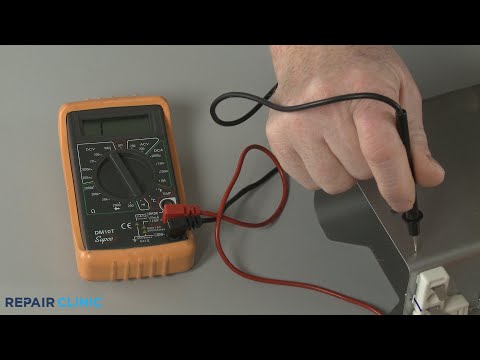
The door switch activates when the dryer door is closed. On most dryers, the door switch makes an audible clicking sound when it activates. To determine if the door switch is working, try starting your dryer and then listen for the “click.” If the door switch makes a clicking sound, it is probably not defective. If you don’t hear a click, use a multimeter to use the door switch for continuity. If the switch does not have continuity, replace it.
A dryer's control board controls the voltage being sent to all of the appliance's electrical components. If the board is defective, it may not allow the dryer to start. You can inspect the board for signs of damage or a shorted component. You can also use a multimeter to test for voltage reaching the drive motor after reviewing the dryer's wiring diagram.
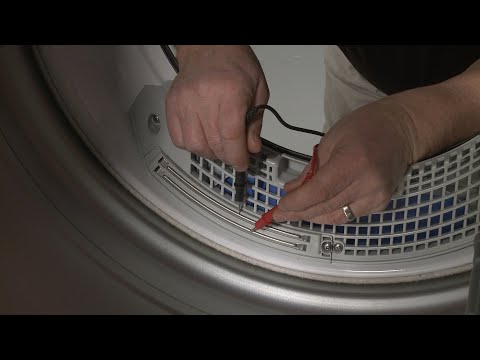
If the dryer won’t start, an article of clothing may have gotten past the lint screen and is caught in the blower wheel. When this happens the drive motor will either hum but won’t start or will make a lot of noise when trying to start. The blower cover will need to be removed to check for obstructions. If the blower wheel is damaged it will need to be replaced.
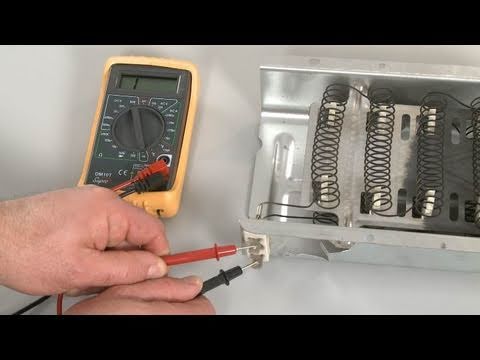
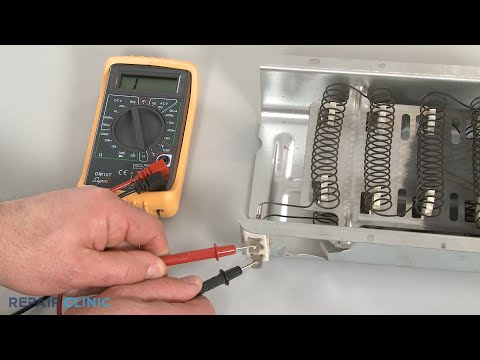
The heating element warms the air before it enters the dryer drum. Over time, the heating element can burn out, causing the dryer not to heat , or short out which can cause the dryer to overheat. To determine if the heating element is defective, use a multimeter to test it for continuity. If the heating element does not have continuity, or is shorted (has continuity to the case), replace it. Note: If the thermal fuse has tripped, some heating elements come with a thermal fuse and high limit thermostat already on them.
The drive motor turns the drum and the blower wheel to exhaust the air. Before replacing the motor, first check the thermal fuse, start switch, and door switch. If all of these parts are working properly, but the motor is making a humming noise, remove the belt from the motor and check the blower wheel for obstructions. If the blower wheel is clear of obstructions, the dryer motor might be at fault. If you suspect the motor is defective, replace it.
Many dryers have a child lock feature which will prevent the buttons from being used when the feature is engaged. The dryer could also be in “Demo” mode or another mode which prevents full operation. Consult the dryer’s user manual for information regarding locking/unlocking the control panel. You can also try resetting the control board by turning the circuit breaker off and back on.
A dryer's idler pulley puts tension on the belt to rotate the drum. If the idler pulley is worn out or damaged, the belt can break or fall off, and actuate a belt switch which can prevent the dryer from starting.
On most dryers, when the dryer belt breaks, the motor will still run, but the drum will not turn. However, some dryers have a switch that shuts off power to the dryer if the drive belt is broken. Check the dryer belt to determine if it is broken. If the belt is broken, replace it.
On most dryers, when the dryer belt breaks, the motor will still run, but the drum won’t turn. However, some dryers have a switch that shuts off power to the dryer if the drive belt is broken. If this switch fails, it could shut off power to the dryer even when the belt is not broken. First, start the dryer and then listen for a humming noise. If the dryer makes a humming noise when you try to start it, this indicates that the belt switch is not defective. Next, search for your model number to determine if your dryer has a belt switch. If your dryer has a belt switch, use a multimeter to test the switch for continuity. If the switch does not have continuity, replace it.
Plug in the dryer or check house power at outlet/circuit breaker.
The main control board might be defective. However, this is rarely the case. Before replacing the main control board, check all of the more commonly defective parts.If you have determined that all of the other components are working properly, replace the main control board. (The control board cannot be easily tested, but you can try to inspect it for signs of burning or a shorted-out component.)
The timer might be defective. However, this is very rarely the case. Before replacing the timer, check all the more commonly defective parts. If you determine that all of the other components are working properly, test the timer by using a multimeter and consulting the wiring diagram. If the timer is defective, replace it.